Embroidery Bear Paw Quilt Tutorial
Fall always inspires me to slow down, stitch by hand, and enjoy cozy projects that bring warmth into our home. For this project, I combined embroidery and quilting into one sweet little quilt, a 36" x 36" Embroidery Bear Paw Quilt. The center of each block features hand embroidery, framed beautifully by the classic Bear Paw design. It’s the perfect size for a baby quilt or wall hanging, and it’s such a fun way to showcase both stitching and quilting in one project.

This post may contain affiliate links, which means I may earn a small commission if you make a purchase through them, at no extra cost to you.
Thank you for supporting Thai Charm and helping me continue to share free tutorials and inspiration with you!
Embroidery
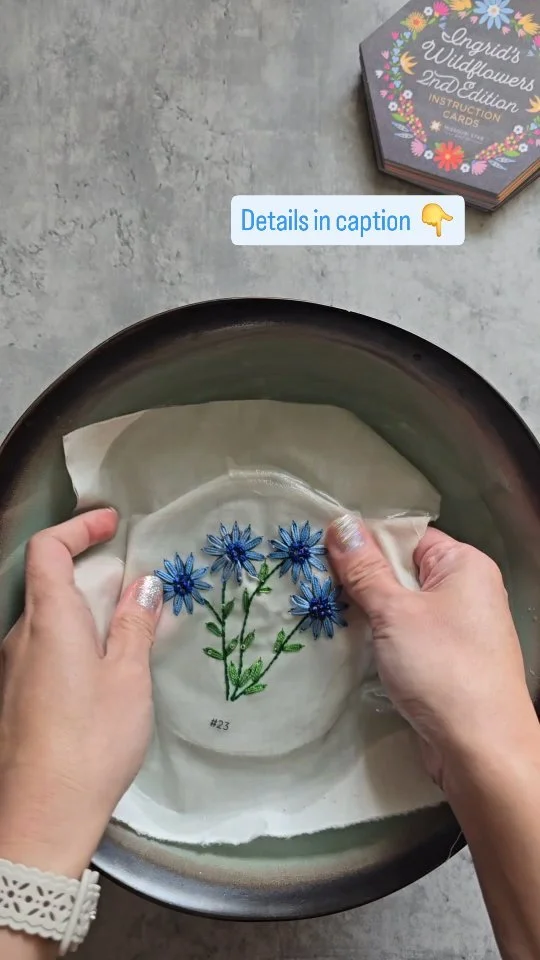
For the embroidery centers, I used the Autumn Wishes Embroidery Stitch Pack and Autumn Wishes Perle Cotton Floss. These give such a soft, seasonal look. I started by cutting 10" squares of Essex Linen for each embroidery block. After stitching, I trimmed each down to 7 1/2" to use as the block center. I also pressed most of my seams open.
NOTE: If you don’t want to use embroidery blocks, you can always replace them with classic blocks like Sawtooth Stars, Nine-Patch, or Log Cabin blocks.
Materials
Here’s what I used for my quilt:
Needle keeper
Basic sewing supplies (scissors, rotary cutter, ruler, pins, thread, iron)
Fabrics
3/4 yard Essex Linen (Linen Yardage)
1/2 yard Creating Memories Spring Woven Stripe Yellow Yardage
1/2 yard Sanctuary Cottonfield Maroon Yardage
1/2 yard Creating Memories Autumn Woven Seamstripe Ginger Yardage
1/2 yard Creating Memories Autumn Woven Tinystripe Cream Yardage
1 1/4 yards Luxe Cuddle® Paloma Rosewater (Minky backing)
1 crib-size batting Missouri Star Nature’s Best 100% Cotton
Finished quilt size: 36" x 36"

Cutting & Quilt Assembly
Cutting
Background (Essex Linen Linen):
(4) 10" squares (for embroidery, trim to 7 1/2" after stitching)
(4) 6" squares (for HSTs)
(8) 2.5" squares
Fabric A (Stripe Yellow):
(3) 2.5" x WOF, sewn and subcut to (2) 2.5" x 22.5" and (2) 2.5" x 26.5"
(2) 1.5" x WOF, subcut to (4) 1.5" x 7.5", and (4) 1.5" x 8.5"
Fabric B (Cottonfield Maroon):
(1) 6" x WOF, subcut to (4) 6" squares
(2) 2.5" x WOF, subcut to (28) 2.5" squares
Fabric C (Woven Seamstripe Ginger):
(2) 2.5" x WOF, subcut to (29) 2.5" squares
(4) 2.25" x WOF (optional for binding)
Fabric D (Tinystripe Cream):
(1) 2.5" x WOF, subcut to (4) 2.5" x 8.5"
(4) 3.5" x WOF, subcut to (2) 3.5" x 30.5", and (2) 3.5" x 36.5"

Assembly
Embroidered centers Stitch your designs on the 10" linen squares. Trim to 7 1/2" after finishing. (Make 4)
Make the HSTs Use the 8-at-a-time method with 6" squares ((4) background + (4) Fabric B). Sew 1/4" away from both sides of the diagonals, cut apart as shown above, and press. Trim to 2 1/2". Each set makes 8 HSTs. Repeat until you have 32 total HSTs.
Sew Fabric A - (1) 1.5" x 7.5" to the top of the block, press. and (1) 1.5" x 8.5" to the right side of the block, and press.
Sew (4) HSTs to the top of the block and press. Pay attention to the orientation of the HSTs.
Sew (4) HSTs and (1) 2.5" Background square to the right side of the block, and press.


Repeat and make a total of 4 blocks. Be sure the embroidery blocks are facing the correct direction. This also means the HSTs may need to go on different sides of the blocks to maintain proper orientation.

Sew (1) 2.5" Background square to one end of (1) 2.5" x 8.5" Fabric D strip, and press. Repeat and make a total of (4) Center sashings.
Sew (1) 2.5" Fabric C square to the ends of (2) center sashings (Fabric D ends) and press toward Fabric D. [Center Strip]
Sew (2) Bear Paw blocks to both sides of (1) Center sashing and press toward the sashing. Repeat to make the other unit.
Sew (2) Bear Paw units to both sides of the Center Strip, and press toward the strip.

Sew (2) 2.5" x 22.5" Fabric A strips to both sides, and (2) 2.5" x 26.5" strips to the top and bottom of the quilt. Press toward the strips.
Alternate and sew together (7) 2.5" Fabric B squares with (6) 2.5" Fabric C squares, press toward Fabric C. Make 2 Side units.
Alternate and sew together (7) 2.5" Fabric B squares with (8) 2.5" Fabric C squares, press toward Fabric C. Make 2 for Top & Bottom units.
Sew (2) Side units to both sides, and the Top & Bottom units to the top and bottom sides of the quilt. Press toward the quilt.
Sew (2) 3.5" x 30.5" Fabric D strips to both sides, and (2) (2) 3.5" x 36.5" strips to the top and bottom of the quilt. Press toward the strips.
The quilt top measures 36.5" x 36.5".

Tips for Working with Minky
If you’ve ever worked with Minky, you know it can get messy fast! One tip I learned from all of you when I did a poll is to use painter’s tape and it works amazingly well. Here’s how I do it using the burrito method (sewing right sides together, turning right side out, then quilting with my domestic machine):
Place your Minky backing right side up.
Lay your batting wrong side down on top.
Add your quilt top wrong side down on top of the batting. Pin in place. [I used a lot of pins with minky]
Place painter’s tape on the Minky backing as close to the quilt top edges as possible.
Cut along the tape carefully so you don’t cut into the quilt top.
Peel away the cutoff Minky slowly.
Sew 1/4" along the perimeter, making sure to leave a 4" gap for turning.
Turn right sides out, then hand sew the opening closed or topstitch.
The best part is no fuzz, no mess, and perfectly neat edges. Once you turn the quilt right side out, everything is clean and ready for quilting.


Wrapping Up
And that’s it, your Embroidery Bear Paw Quilt is finished! I love how the embroidery adds a personal, handmade touch to such a classic quilt block. This little quilt is perfect for gifting, decorating, or just enjoying as a seasonal accent in your home.
If you haven’t tried it yet, I hope this tutorial inspires you to give it a try. I’d love to see your version—Be sure to tag me @ThaiCharmllc so I can cheer you on!
Happy sewing,
Sandy
you might’ve seen this one on the ’gram!